How To Push Back A Retaining Wall: A Comprehensive Guide
If you have a leaning or collapsing retaining wall, it’s essential to take action before it causes damage to your lawn or property. Pushing back a retaining wall can be challenging and requires proper planning and execution. However, with the right skills and equipment, you can do it yourself and save money on hiring professional help.
This comprehensive guide will walk you through pushing back a retaining wall step-by-step. We will cover everything from assessing your retaining wall’s condition to choosing suitable backfill materials and building techniques for long-lasting results. Following our guide, you can fix your leaning retaining wall safely and effectively while avoiding common pitfalls. So let’s get started!
Understanding Retaining Wall Problems and Causes
If you have a retaining wall on your property, it’s essential to understand the potential problems that can arise. Common issues include bulging, leaning, or collapsing walls due to inadequate drainage and backfill. The weight of soil and items placed on the ground can cause problems over time. You recognize signs that your retaining wall needs attention before severe damage occurs.
Common retaining wall problems.
Retaining walls can experience issues such as improper drainage and inadequate footing, leading to bulges or collapses. To prevent these problems, it’s essential to ensure proper drainage behind the wall and build a solid foundation. One way to achieve this is by digging a trench along the wall’s length and filling it with crushed stone or gravel. This will help hold back the soil behind the wall while allowing water to drain away.
If you need to move the wall, avoid pushing against it directly but use pulleys or levers instead. It’s also crucial to consider the weight of items placed on the ground near the retaining wall and ensure that it doesn’t add any additional pressure on top of what it already has to bear. Understanding these common retaining wall problems will help you identify potential issues before they become more severe causes of keeping wall failure in your backyard or garden area.
Causes of retaining wall failure
Improper tie-backs, clogged drains, weak foundations, and the weight of items placed on the ground can all contribute to retaining wall failure, causing it to buckle or lean like a tired and overburdened soldier. The importance of the soil against the wall exerts lateral pressure that proper tie-backs and foundation support must counter.
Clogged drains can accumulate water behind the wall, creating hydrostatic pressure that pushes against it. Weak foundations can cause settling or shifting, disrupting the balance of forces holding up the wall.
Soil conditions also play a role; poor drainage or unstable soil can undermine the stability of a retaining wall. Understanding these causes is crucial before attempting to push back a retaining wall. (Read Can You Put A Space Heater On Carpet)
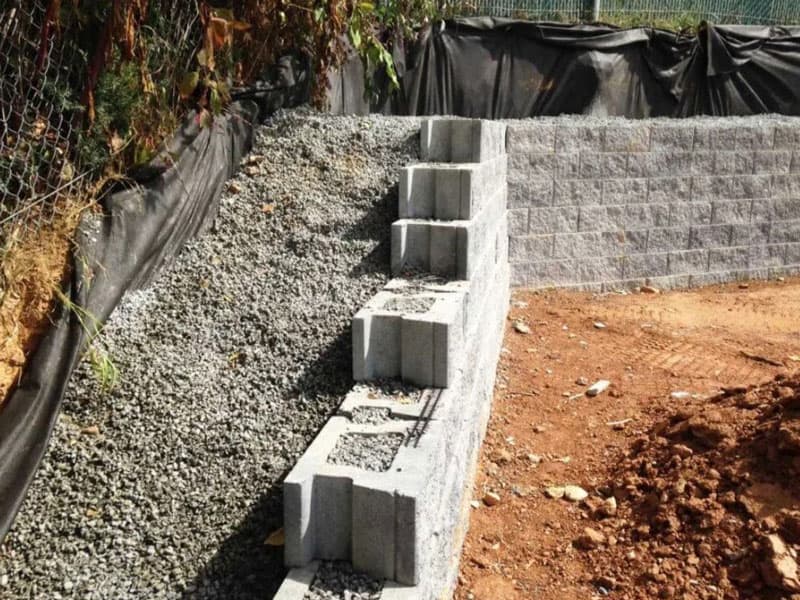
The importance of drainage and backfill
To ensure the stability of your retaining wall, you need to focus on creating proper drainage and backfilling with materials like gravel or sand to prevent water buildup and soil instability. Improper drainage can lead to water accumulation behind the wall, resulting in increased hydrostatic pressure that can cause the wall to bulge or collapse.
Backfilling with compacted materials helps distribute weight evenly across the wall and prevents soil erosion, ensuring it remains stable over time. In addition, installing dead men at regular intervals along the length of the retaining wall provides additional support against lateral pressure from the soil.
Suppose you’re unsure how to properly design and install drainage and backfill for your retaining wall; seek professional help. The effects of soil and weight on retaining walls will be discussed in the subsequent section.
Effects of Soil and Weight on retaining walls
Creating proper drainage and backfilling with appropriate materials can help distribute weight evenly across a retaining wall, preventing soil erosion and instability caused by the effects of soil and added weight. When excavating the area where you want to build a wall, it’s essential to ensure the base is level and compacted before adding backfill material.
Additionally, an adhesive like Landscape Block Adhesive can help keep caps in place and prevent cracking due to pressure from dirt or added weight. A leaning retaining wall may indicate inadequate backfilling or poor construction quality, ultimately leading to costly repairs or replacement.
The height of the wall should also be considered when determining how much weight it will need to bear from the dirt behind it. Signs that your retaining wall needs attention include bulging or bowing, cracks in the structure, water pooling at its base, or sinking/bowing of nearby walkways or patios due to uneven dirt settling behind the wall.
Signs that your retaining wall needs attention
Notice bulging or cracks in your retaining wall, water pooling at its base, or sinking/bowing of nearby walkways or patios due to uneven dirt settling behind the wall. It may be time to seek professional help. Assessing whether the wall needs attention is essential before knowing how to push back a retaining wall. A table can provide a visual representation of signs that indicate wall problems.
Signs such as bulging in front of the wall, cracks on top of the wall, and water pooling at the base show there may be structural issues. Extensive retaining walls need reinforcement every year or two and should not be left unchecked for long periods.
Understanding where damage occurs can help assess whether to build or push back existing structures. The base and back of the wall are especially prone to erosion and settling, which can cause damage over time. Knowing when to seek professional assistance is vital before attempting any fixes yourself. This section will assess your leaning retaining wall without writing ‘step.’
| Signs Of Retaining Wall Problems | ||
|---|---|---|
| Bulging in front of the wall | ||
| Cracks on top of the wall | ||
| Water pooling at the base | ||
| Sinking/Bowing nearby walkways | Unevenness in the wall structure |
Assessing Your Leaning Retaining Wall
When assessing your leaning retaining wall, several key points must be considered. First, you must evaluate the height and stability of the wall to determine if it can be saved or needs to be demolished. Next, inspect the backfill, soil, and garden behind the wall to identify any issues contributing to its instability. It’s also important to check the base and footing of the border for signs of damage or movement.
If you’re unsure about any aspect of this assessment, consulting with a professional can provide an expert opinion on how best to proceed.
Height and stability of the wall
You may think that the height and stability of your retaining wall aren’t significant concerns, but ignoring them could lead to dangerous consequences. If your fence needs to be pushed back, ensuring a stable retaining structure is essential. Steel reinforcement shouldn’t ever be placed incorrectly, as this can cause the wall to begin to lean over time.
Inspecting the backfill, soil, and garden behind the wall is crucial for any signs of instability or erosion. Considering these factors will help create a stable and safe environment for everyone around you.
Inspecting the backfill, soil, and garden behind the wall
Before beginning any repairs or construction on a retaining wall, inspecting the backfill, soil, and garden behind the structure to ensure stability and prevent erosion is crucial. Walls push against the earth over time, leading to saturated soil that can break down. It’s important to compact the ground properly and consider dead men or other reinforcements if planting trees or adding weight behind the wall.
Building codes may also have specific requirements for backfilling materials and techniques. A sturdy foundation is necessary for retaining walls to retain earth effectively without bulging or collapsing. Checking the base and footing of the wall will be covered in more detail in the subsequent section about ensuring proper wall support structures. (Learn How Long Does Thinset Take To Dry)
Checking the base and footing of the wall
To ensure the stability of your retaining wall, it’s essential to check the base and footing of the structure. The floor holds up the weight of the wall and distributes it evenly, while the bottom provides a solid foundation for the wall. Checking these elements can help you identify potential issues that may cause movement or instability in your retaining wall.
Consult a professional if you’re unsure how to check these aspects of your wall properly. In general, make sure that the material used for both the base and footing is strong enough to hold up against any weight or pressure placed on it by soil or water. Fasten any connections between materials securely to ensure they don’t shift over time. Use this table as a guide when checking your retaining wall’s base and footing:
| Element | What to Check | Signs of Damage |
|---|---|---|
| Base | Is it level? Is it made from sturdy material? Is there proper drainage? | Cracks, bulges, unevenness |
| Footing | Is there proper depth? Is it made from sturdy material? Does it provide enough support for the height of your wall? | Cracks, sinking, unevenness |
Identifying signs of wall movement can help determine whether pushing back your retaining wall is necessary or if other repair options are available.
Identifying signs of wall movement
If you notice any cracks, bulges, sinking, or unevenness in your retaining wall’s base or footing, it may be a sign of wall movement that needs to be addressed. These signs may indicate that the soil behind the wall is saturated and cannot hold some excavated material, causing the weight to shift and destabilize the structure.
Tree roots can also contribute to this issue. Retaining walls are designed to hold back earth and support the weight above them, so any indication of movement should not be ignored. In some cases, pushing back a retaining wall may cause further damage if not done correctly.
Suppose you’re unsure about identifying signs of wall movement or how best to address it. In that case, call in a professional who can provide an expert opinion on whether pushing back the retaining wall is feasible and safe for your specific situation.
Consulting with a professional for an expert opinion
Consider consulting with a professional for their expert opinion on the feasibility and safety of addressing any signs of movement in your retaining wall. A qualified professional can provide valuable insight into the structural integrity of your wall and recommend appropriate solutions.
Here are some reasons why consulting with a professional is essential:
- They can identify potential hazards not immediately apparent to an untrained eye.
- They can help you determine if pushing back the wall is a viable option or if rebuilding is necessary.
- They can guide what materials to use, such as timber or concrete blocks, and how to properly install dead men for added support.
- They can assess whether saturated soil or topsoil erosion contributes to the issue and recommend drainage solutions.
- Their expertise can save you time and money in the long run by preventing further damage or costly mistakes.
Once you’ve consulted with a professional and determined that pushing back your retaining wall is feasible and safe, it’s time to prepare for the process.
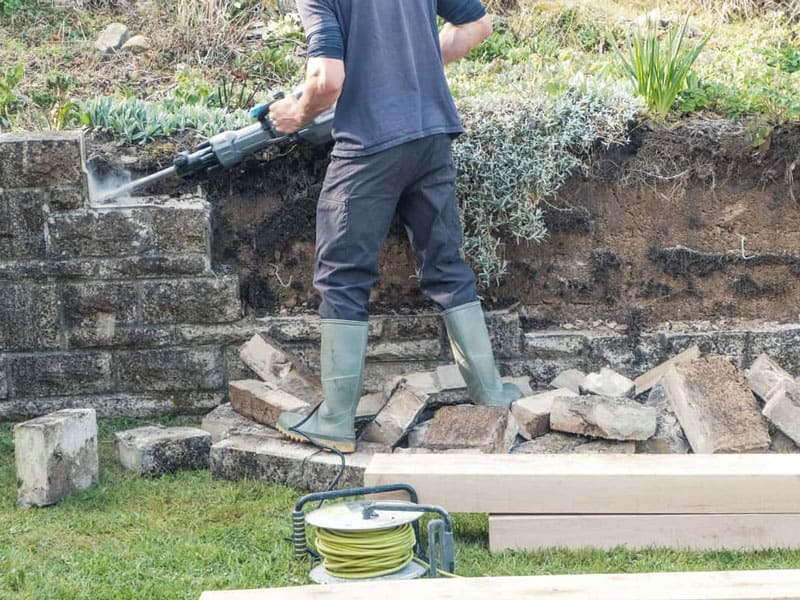
Preparing to Push Back the Retaining Wall
Before pushing back your retaining wall, preparing appropriately for the job is crucial. You’ll need tools like a jackhammer or sledgehammer, pulleys, and sandbags. Safety is also paramount, so ensure you have protective gear and follow proper protocols. Don’t forget to obtain the necessary permits and adhere to building codes before excavating or trench preparation. For more enormous retaining walls or complex situations, consider consulting with professionals for guidance on design and execution.
Tools and materials needed for the job
You’ll need a few essential tools and materials to push back your retaining wall, so let’s ensure you’re prepared before diving into this project. First, grab a sledgehammer to remove the caps from your fence carefully. Next, prepare pea gravel and dead men (long wooden stakes) for support as you push the wall back. You’ll also need a tamper to compact the saturated soil behind the new foundation.
As you fill behind the wall, it’s essential to use proper drainage techniques to prevent future water buildup issues. Remember that walls built without adequate drainage can lead to bulges or collapse in the future. With these tools and materials, you can push back your retaining wall and transform your outdoor space. Understanding the importance of safety measures is crucial, so take all necessary precautions before beginning this project.
Understanding the importance of safety measures
For a smooth and secure DIY project, it’s essential to take necessary safety measures when pushing back a retaining wall. Before starting work, wear appropriate safety gear such as gloves, eye protection, and sturdy shoes. It’s also important to check the soil conditions around the wall, as saturated soil can cause instability during construction. Use dead men or cross braces to anchor the retaining wall to ensure excellent support for your new outdoor space.
A tamper is another essential tool that helps compact dirt together tightly, ensuring it won’t shift over time. Never attempt to push back a retaining wall alone, and always have someone available in an emergency. These measures allow you to safely build your new outdoor space without any unforeseen accidents or injuries. For more information on obtaining necessary permits and adhering to building codes, continue reading below.
Obtaining necessary permits and adhering to building codes
Obtaining the required licenses and adhering to building codes when constructing your retaining wall is essential to ensure a smooth and hassle-free project. This includes checking with your local building department for zoning regulations or engineering requirements and obtaining necessary permits before starting construction.
Additionally, you should consider the following three items:
- Saturated soil can weaken the stability of a retaining wall, so it’s essential to take proper drainage measures before beginning construction;
- Dead men can be used behind the border to add additional support and prevent bulging;
- Fill behind the wall should be carefully compacted toto avoid settling and adding pressure on the wall.
Walls built without adhering to these guidelines may not meet safety standards or last as long as intended. Moving forward into excavation and trench preparation requires careful planning and attention to detail.
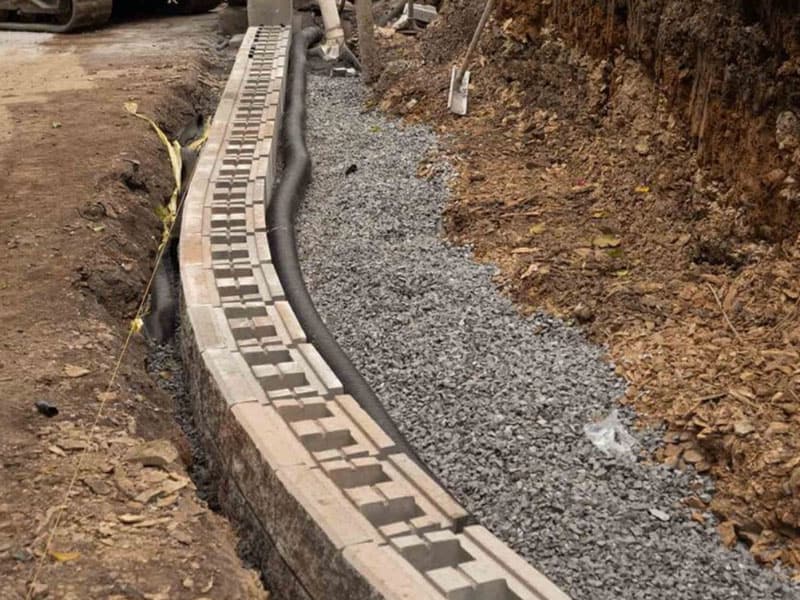
Excavation and trench preparation
Before beginning excavation and trench preparation, make sure you have carefully planned and considered the necessary steps to ensure a stable and long-lasting retaining wall. The first step in this process is to excavate the area behind the wall and create a trench behind it. (Learn How Long Does Mortar Take To Dry)
This trench will be filled with pea gravel to prevent soil from saturating, which can cause the retaining wall to fail. Next, lock the wall back using dead men or anchors driven into the ground behind it. Fill behind the wall with saturated soil to support its weight. A 3-column by the, 5-row table can help organize these steps for easier understanding:
| Step | Description |
|---|---|
| 1 | Excavate the area behind the wall |
| 2 | Create a trench behind the wall |
| 3 | Fill the channel with pea gravel |
| 4 | Lock the fence back using dead men or anchors |
| 5 | Fill behind the wall with saturated soil |
It’s important to note that these steps may vary depending on the size of your retaining wall and other complex situations that may arise during construction. Continue reading in our next section to learn about considerations for large retaining walls and complex problems.
Considerations for large retaining walls and complex situations
Suppose you’re dealing with a large retaining wall or complex situation. In that case, it’s essential to consider factors such as soil conditions, drainage, and the use of geogrids to ensure the stability and longevity of your project. Firstly, saturated soil can increase the weight and pressure on your retaining wall, so addressing drainage issues is crucial before pushing back.
Secondly, for more enormous walls or those in complex situations such as those held in place by dead men or garden features, consider using a sledgehammer or other heavy-duty equipment for greater efficiency. Thirdly, incorporating geogrids during construction can help distribute weight evenly across the wall and improve strength.
Remember that proper planning is critical when dealing with large or complex retaining walls to avoid potential safety hazards down the line. In the next section, we’ll provide a step-by-step guide on how to push back a retaining wall safely and effectively.
How to Push Back a Retaining Wall: Step-by-Step Guide
To push back a retaining wall, follow these five steps:
- Excavate the soil behind the wall.
- Move the border back into its original position.
- Install proper drainage and backfill material.
- Compact the backfill and replace any dislodged dirt.
- Reinforce the wall with adhesive if necessary.
By following this step-by-step guide in a technical and precise manner, you can successfully push back your retaining wall to create more space in your backyard.
Step 1: Excavate the soil behind the wall
Diggin’ time! Get your shovels ready because the first step in pushing back a retaining wall is to excavate the soil behind it. This involves removing all the dirt and debris from the space behind the wall until you reach solid ground. Remove any saturated dirt present, as this can lead to future issues with the wall’s stability.
Additionally, if you plan on using dead men (horizontal anchors used to provide additional support for walls built on slopes), dig trenches for them before moving on to step two. By excavating this area, you’ll create enough space behind the wall to move it back into its original position without damaging surrounding structures or landscaping features.
Now that you’ve completed your excavation, moving the wall back into its original position is time to move on to step two.
Step 2: Move the wall back into its original position
Now that the excavation’s complete, it’s time to move the retaining wall back to its original post. Before beginning, ensure the soil behind the wall isn’t saturated with water. If it is, wait until it dries out or uses a pump to remove excess water.
To move the wall, use dead men – long pieces of wood or steel stakes that hold it in place while pushing it back. Drive them into the ground behind the wall at an angle and attach them to the wall using cables or chains. Use a hydraulic jack or come-along to apply pressure and slowly move the border back into its original position. Be careful not to overdo it and cause more damage.
Once the retaining wall is back in its original position, proceed with step 3: install proper drainage and backfill material to ensure stability and prevent future damage from occurring.
Step 3: Install proper drainage and backfill material
Congratulations, you’re almost done fixing your retaining wall! The next step is to ensure its stability by installing proper drainage and backfill materials. This is crucial because saturated soil can cause the wall to shift or even collapse. To prevent this, install a layer of crushed stone behind the wall to create a drainage area and to avoid water buildup.
Additionally, use dead men – long wooden stakes driven into the soil at an angle – to hold the wall in place and distribute pressure evenly throughout the structure.
Once these measures are in place, carefully backfill with appropriate material, such as gravel or sand, ensuring not to dislodge any existing soil. Proper drainage and backfilling techniques will strengthen your retaining wall enough to withstand future pressures.
Now onto step 4: compact the backfill and replace any dislodged soil…
Step 4: Compact the backfill and replace any dislodged soil
To ensure the stability of your retaining wall, it’s important to compact the backfill and replace any dislodged dirt using a tamper or compactor. Remember, saturated soil can cause instability in the retaining wall, so address any drainage issues before compacting the backfill.
Here are five things to keep in mind when compacting the backfill and replacing dislodged soil:
- Use dead men or reinforcement bars to anchor the wall if required.
- Compact small areas at a time, working from bottom to top.
- Don’t simply dump and fill with backfill. Instead, add layers of backfill material between each layer of soil that is replaced.
- Ensure proper compaction by checking for voids with a rod or similar tool.
- If necessary, moisten dry soil before compaction.
With these steps complete, you’ll be ready to reinforce your retaining wall with adhesive if necessary.
Step 5: Reinforce the wall with adhesive, if necessary
After ensuring proper compaction of the backfill, it’s time to reinforce the stability of your retaining wall with glue if necessary. Adhesive holds retaining wall blocks or stones together and creates a bond that strengthens the barrier.
In areas with saturated soil or significant water runoff, the adhesive becomes even more critical as it can help prevent the wall from shifting or collapsing due to external forces. Additionally, dead men may be used in conjunction with adhesive for added reinforcement. These are long pieces of wood or metal buried behind the retaining wall and anchored into the ground to hold them in place.
By taking these measures, you can ensure that your retaining wall will withstand any potential challenges and provide long-lasting protection for your outdoor space. Let’s discuss building a durable retaining wall by focusing on its design and construction methods. (Read Pads To Stop Doors Slamming)
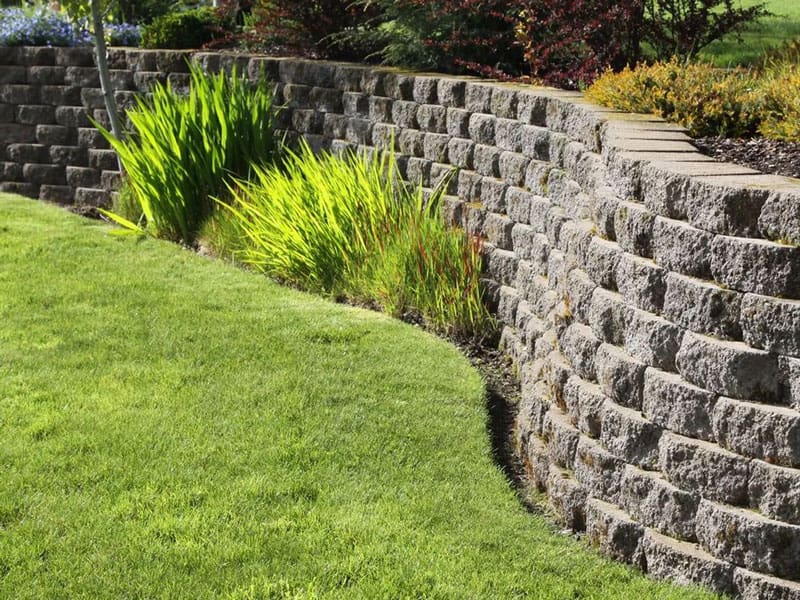
Building a Long-Lasting Retaining Wall
If you want to construct a durable retaining wall, remember several key points. First, choosing suitable materials and building techniques ensures long-lasting stability. Second, proper maintenance over time can help prevent future learning or other problems.
Finally, for complex situations, it’s important to consider seeking professional help from an experienced contractor or engineer who can provide guidance and expertise throughout the process. By following these tips and carefully building your retaining wall, you can ensure it stands firm and protects your property for years.
Tips for constructing a durable retaining wall
Constructing a durable retaining wall requires careful consideration of factors such as adequate drainage, proper backfill materials, and a strong foundation. To hold up against saturated soil and the purpose for which it was built, push back or not, here are some tips to keep in mind:
- Use high-quality backfill materials such as gravel or crushed stone to improve drainage.
- Consider installing dead men, horizontal anchors extending from the wall into the soil behind it. This helps distribute weight and prevent bulging or buckling.
- Ensure the foundation is deep enough to support the weight of the wall and any additional load placed on top of it.
- Use proper construction techniques such as interlocking blocks or reinforced concrete to create a sturdy structure.
- Regularly maintain the wall by checking for signs of damage and making repairs promptly.
Choosing suitable materials and building techniques will ensure your retaining wall’s durability over time without pushing it back again.
Choosing the suitable materials and building techniques
Choosing suitable materials and techniques is important when building your durable retaining wall. You want to ensure that the division can hold up against saturated soil and water pressure over time.
Some popular materials for retaining walls include stone, block, concrete, and wood. Dead men (t-shaped anchors) can help reinforce the wall’s foundation.
Building techniques such as batter or pitch, tie-backs, drains, footings, or compacted gravel beds are crucial for constructing a long-lasting retaining wall.
By selecting strong materials and proper construction methods, your retaining wall will last for years. Moving forward into maintaining the retaining wall over time…
Maintaining the retaining wall over time
Regularly inspecting and maintaining the drainage system is essential to keep your retaining wall in good condition. Repair any cracks or damage promptly and trim any vegetation that may pressure the wall. The purpose of retaining walls is to hold back soil and prevent erosion, but saturated soil can put a lot of pressure on them. To ensure they’re built to last, use dead men (anchor blocks) to reinforce the structure and provide additional stability. Maintaining your retaining wall will help prevent future leaning or retaining wall problems.
Preventing future leaning or retaining wall problems
If you want to ensure the longevity of your retaining wall, you must take preventive measures such as resolving drainage issues and strengthening the foundation to weather any storm.
Saturated soil is one of the leading causes of retaining wall problems, which makes soil stabilization an essential part of wall construction. Dead men or anchors can provide lateral support for the wall and prevent leaning. Also, proper backfilling methods and footing preparation are necessary to maintain structural integrity.
Regular maintenance, including checking for signs of water damage and repairing any cracks or bulges, will also help prevent leaning in the future. By taking these preventative measures, you can ensure that your retaining wall lasts for years. Moving forward, when considering professional help for complex situations, there are times when a more experienced hand is required to retain walls beyond simple maintenance work.
Considering professional help for complex situations
Now that you’ve learned about preventing future leaning or retaining wall problems, knowing when to consider professional help for more complex situations is essential. If your retaining wall is experiencing issues such as saturated soil or the need for dead men, seeking professional assistance may be necessary to ensure a successful pushback.
Additionally, if a previous owner built the wall and there are unknown factors, consulting with a professional can provide valuable insight and prevent costly mistakes. This comprehensive guide emphasizes the importance of proper planning and execution when pushing back a retaining wall, and seeking professional help is one common way to ensure success in more complex situations.
Conclusion
Congratulations! You’ve successfully pushed back your retaining wall, and now you can enjoy a stable and secure lawn. Remember that retaining walls are essential for protecting your property from erosion and slope issues, so it’s crucial to maintain them regularly. Remember that pushing back a retaining wall requires proper skills, equipment, and safety measures, so don’t hesitate to seek professional help if necessary.
For example, John had a leaning retaining wall on his property, causing water runoff issues and soil erosion. He decided to push it back using the step-by-step guide outlined in this article. John followed all the safety measures and used appropriate backfilling materials to ensure his new retaining wall would be long-lasting.
In conclusion, pushing back a retaining wall is a challenging but rewarding DIY project that requires careful planning and execution. By following the tips and steps in this guide, you can restore stability to your property while saving money on professional services.
Remember always to prioritize safety first when working on any construction project.