How to Paint Between Deck Boards
Painting or staining is a great option if you want to give your deck a fresh look and protect it from the elements. However, images can be challenging if your deck has gaps between the boards. Fear not, though; with the right tools and techniques, you can achieve a smooth and even coat of paint or stain between those pesky deck boards. First things first, you’ll need to gather your materials. You’ll want a sturdy paint scraper or wire brush to remove any old paint or stain between the boards. The sandpaper will also come in handy for smoothing out any rough spots.
To apply your paint or stain, consider using a brush designed for deck surfaces that can fit between the gaps in your boards. A small roller may be helpful as well. With these tools and some preparation work under your belt, you’ll be ready to tackle painting between your deck boards like a pro!
What is the best way to paint or stain between deck boards?
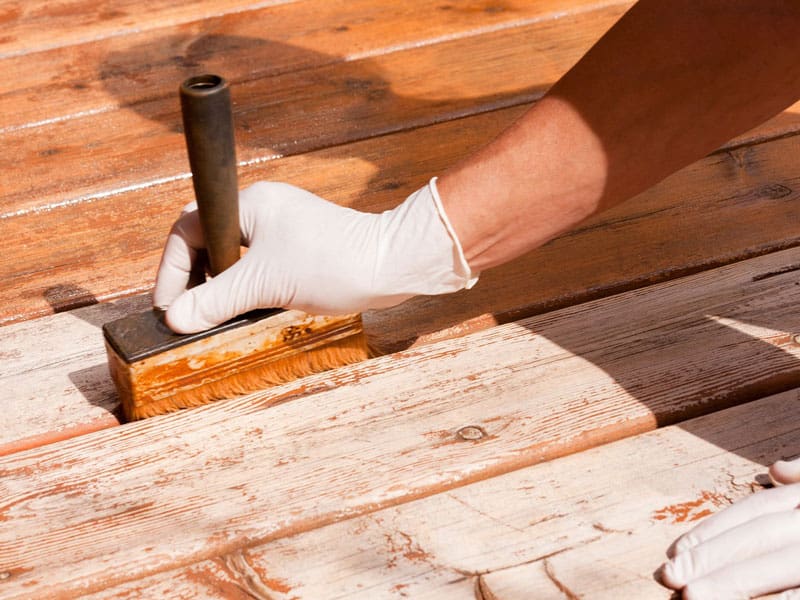
You use crack, and groove brush is used to paint or stain between deck boards to reach narrow gaps and cracks. Before painting or staining, apply wood filler to minor damages for smoother results. Protect your deck by applying the first coat of paint or stain, and use a tray to remove excess dye and avoid dripping between deck boards; for hard-to-access areas between panels, sponge in color.
Use a crack and groove brush to reach narrow gaps and cracks
When painting between deck boards, use a crack and groove brush – it’s perfect for running those narrow gaps and cracks that other tools can’t get to. Pour some of your paint into a tray and dip the brush in the paint. Apply the color using short strokes in one direction, working in small sections at a time.
Be careful not to overload the brush with too much paint, as excess paint can cause drips or peeling later. Keep applying until you’ve covered all areas that need painting, and allow the paint to dry completely before applying another coat if needed.
Before painting, remove old paint using chemical strippers or manual approaches like sanding between deck boards or scraping away peeling paint from larger cracks. Remember to apply wood filler to small cracks before painting or staining to ensure an even finish.
Apply wood filler to small cracks before painting or staining.
Before giving your deck a facelift, filling in the gaps like a puzzle with wood filler that acts as the missing piece is essential. This ensures an even finish when painting or staining between deck boards. Applying wood filler to small cracks is necessary to prevent paint from seeping into them, which can cause discoloration and unevenness on the surface.
When using deck paint or stain, it’s essential to clean the deck thoroughly before starting and remove any old paint that may be present. Applying wood filler to small cracks before painting or staining between boards ensures that your finished product looks professional and polished.
Remember that filling in these gaps will also help protect your deck by preventing moisture from getting trapped between the boards. Once you’ve applied wood filler, protect your deck using the first coat of paint or stain. (Learn How Much Should Deck Boards Overhang)
Protect your deck by applying the first coat of paint or stain.
Give your deck the protection it deserves by applying the first coat of your preferred finish, paint, or stain to the deck’s surface. This step protects your older or new deck from weathering and wear. To ensure proper coverage, use a crack and groove brush, bristle brush, pump sprayer, or moldable sponge to apply the finish between deck boards.
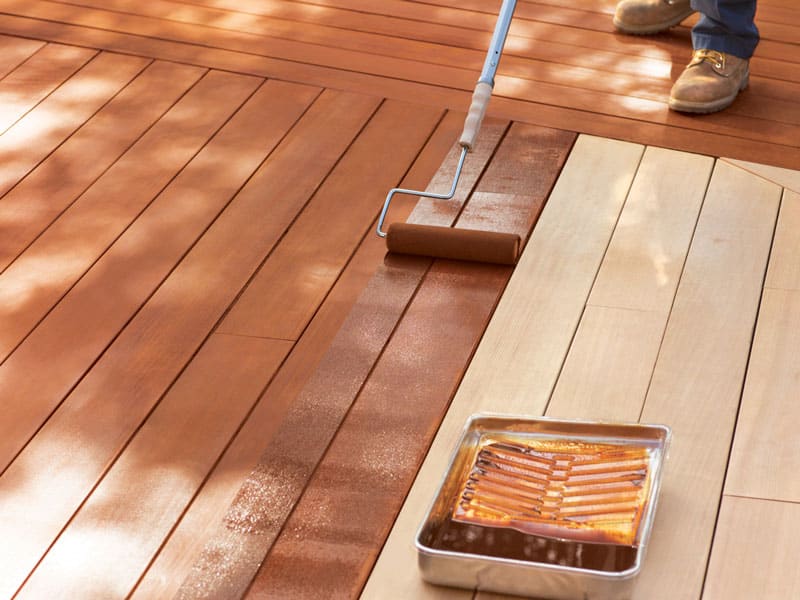
For more significant gaps between boards, use silicone caulk sealant; use a wood filler before painting for smaller holes. After applying the first coat evenly on all surfaces, let the paint dry completely before adding additional coats. Staining between deck boards is also possible and recommended for extending the protective layer while making its appearance uniform. Use a tray to remove excess paint and avoid dripping between deck boards as you continue with subsequent coats in preparation for your outdoor space’s next season.
Use a tray to remove excess paint and avoid dripping between deck boards
To prevent excess dripping while painting your deck, use a tray. Did you know that, on average, a gallon of paint covers around 350 square feet of decking?
The best way to paint between deck boards is to apply the paint with a bristle brush or pump sprayer. Then, use a tray to remove excess dye and avoid dripping. It’s essential to clean the deck boards before applying any paint or stain and ensure no debris is left in the gap between the boards. Also, breaking the old paint’s protective film will help with adhesion for your new coat.
To spread the paint evenly, it’s recommended that you apply it between the deck boards using a crack and groove brush or moldable sponge brush. Remember that having an optimal gap between deck boards (at least 1/8 inch) can also help prevent dirt and debris from getting trapped. Once you’ve applied your first coat of paint or stain, let it dry thoroughly before advancing to another skin. If you struggle to reach hard-to-access areas between boards, using a sponge in color may be your solution.
Sponge in the paint to reach hard-to-access areas between boards
Now that you’ve removed excess paint from your brush, it’s time to move on to hard-to-access spaces between deck boards. The best way to paint or stain in these small gaps is by using a sponge in the paint.
Here are three things to keep in mind when applying paint with a sponge:
- Dip the sponge into the paint and squeeze out any excess.
- Use the sponge to apply the paint onto the deck boards, and be sure not to over-saturate the area.
- Be gentle when using a sponge to avoid damaging any nearby wood.
Following these tips, you can easily apply paint between deck boards without making a mess or leaving unsightly drips.
Once you’ve finished painting between your deck boards, it’s essential to know how to remove old paint or stains between them before applying a new coat.
How can you remove old paint or stain between deck boards?
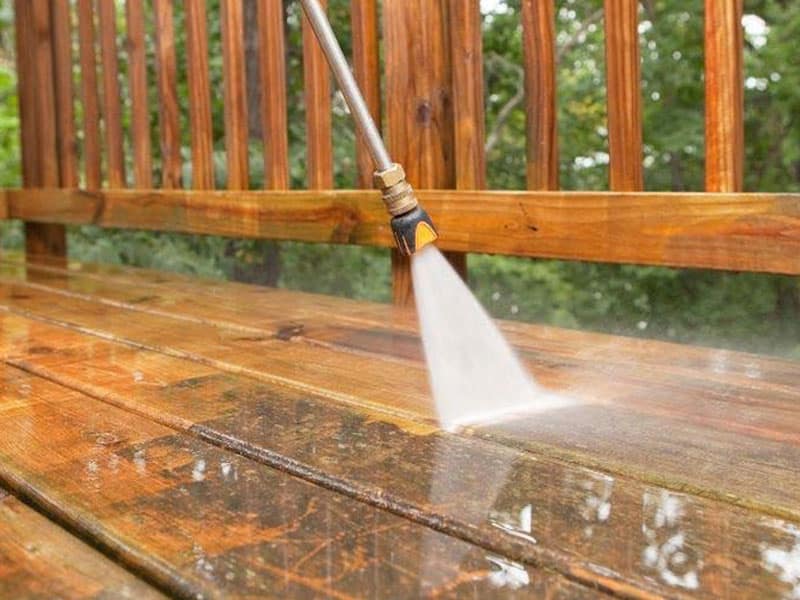
To remove old paint or stain between deck boards, you can use a paint stripper or sandpaper to strip it from the deck’s surface. Apply lacquer thinner to dissolve old paint or stain and remove it with a scraper.
Clean the deck thoroughly between sanding or stripping sessions to ensure a smooth coat of paint or stain. Use a crack and groove brush to remove and groove brush to remove old paint from gaps between deck boards.
If some paint remains with a gap between the boards, use a scraper or small chisel to remove it.
Use a paint stripper or sandpaper to remove old paint or stain from the deck’s surface.
To ensure a smooth and even layer of paint on your deck boards, consider using a paint stripper or sandpaper to remove any old paint or stain from the deck’s surface before beginning the painting process. To remove old paint or stain, use a paint stripper or sandpaper and work in sections until all areas between deck boards are covered. Use caution during this process as it can be easy to damage the wood deck.
Once all old paint is removed, remove debris with a broom and apply painter’s tape around cracks to avoid getting excess paint in unwanted areas. Allow enough time for the deck’s surface to dry before painting between deck boards using a slim bristled brush, crack and groove brush, sponge brush, pump sprayer, or even a small paint roller.
Before applying any new coat of paint to your decking board gaps and cracks, make sure that you let it dry completely so that no moisture will get trapped underneath, causing issues down the line.
Apply paint thinner to dissolve old paint or stain and remove it with a scraper.
Using a paint thinner can be like using a magic potion to dissolve the old coat of color on your deck, allowing you to easily scrape away the past and prepare for a fresh new look. When painting between the boards or staining between deck boards, applying paint thinner is an effective way to remove old paint or stain from the spaces between deck boards.
This step is crucial when working with a new or older deck that hasn’t been cleaned and sanded. Removing any remaining traces of old color creates a surface that’ll better adhere to your top coat of paint or stain. Once you’ve applied the paint thinner, use a scraper to remove the loosened layers of old paint gently. Clean the deck thoroughly between sanding or stripping sessions to ensure a smooth coat of paint or stain.
Clean the deck thoroughly between sanding or stripping sessions to ensure a smooth coat of paint or stain.
Ensure you thoroughly clean your deck between sanding or stripping sessions to ensure a smooth and flawless coat of paint or stain. This is especially important if you’re working on an older deck with layers of old paint or stain.
Cleaning the deck boards will remove any remaining dust, debris, or residue from sanding or stripping, creating a surface optimal for paint adhesion. Use a stiff-bristled brush and water to scrub away any dirt, grime, or mold accumulated on the deck boards.
Rinse thoroughly with water and let the deck dry completely before painting or staining. Taking the time to clean the deck between sanding or stripping sessions properly is one of the best ways to achieve a smooth coat of paint or stain on your deck boards.
Now it’s time to remove old paint from gaps between deck boards with a crack and groove brush.
Remove old paint from gaps between deck boards with a crack and groove brush.
To achieve a flawless finish on your deck, you’ll need to remove old paint from the gaps between your decking boards with a crack and groove brush – did you know that up to 40% of homeowners will attempt to tackle deck painting themselves? Before using the brush, ensure the deck boards have been cleaned and sanded. You may also need to break the protective film of the paint already on the boards for better adhesion. To clean all deck panels before painting or staining, use mineral spirits or paint thinner on a rag.
Once you’re ready to apply paint or stain between deck boards, ensure you have an even layer of color using tools such as crack and groove brushes, bristle paintbrushes, pump sprayers, moldable sponge brushes, or scouring pads. Staining can be done using moldable sponges or scouring pads. Remember that silicone caulk is recommended for sealing larger spaces between deck boards, while the wood filler is best suited for smaller ones.
Be sure to cover plants around the decking location with painter’s plastic or drop cloths before starting any work and allow ample time for each coat of paint or stain to dry thoroughly before advancing to subsequent layers. Lastly, don’t forget that removing old paint or stain with a gap between the boards requires either a scraper or a small chisel.
Remove paint or stain with a gap between the boards using a scraper or small chisel.
Now that you’ve removed old paint from the gaps between your deck boards with a crack and groove brush, it’s time to focus on removing any remaining paint or stain with a scraper or small chisel. Use these tools carefully to avoid damaging the wood of your deck boards.
Once all paint or stain has been removed, applying wood filler to any cracks in the deck boards is essential before painting or staining. Filling these gaps create an even surface for using the paint or stain. Now that you’ve prepped your deck boards thoroughly, what tools and materials do you need to paint or stain between them?
What tools and materials do you need to paint or stain between deck boards?
Using crack and groove brushes, bristle paintbrushes, pump sprayers, and moldable sponge brushes are all great tools that can be used to apply paint or stain between deck boards. To help you decide which tool is best for you, we’ve created a table below outlining the pros and cons of each option. When painting or staining an older deck with small gaps between boards, it’s essential to prepare the surface by cleaning and filling any cracks properly.
Once the surface is ready, pour your chosen paint or stain into a paint tray and use your preferred tool to apply it in the spaces between deck boards. Remember to work carefully to avoid drips and streaks in surrounding areas. Once finished, allow ample time for drying before adding additional coats if desired. Now that you know what tools and materials to effectively paint or stain between deck boards on an older deck, let’s explore whether this process is possible on a new deck.

Can you paint or stain between deck boards on a new deck?
Yes, you can paint or stain a new deck between the boards. However, allowing the new deck to dry for at least two weeks before applying any paint or stain is essential. To ensure even coverage, apply a coat of primer before painting or staining. If you choose to paint, use porch and patio paint for durability. If you decide to stain, use a water-repellent sealant to protect the wood from moisture and UV rays.
Yes, you can paint or stain a new deck between the boards
To ensure your new deck’s protection and appearance, it’s important to paint or stain between the boards. You can use various tools and techniques for paint application, such as crack groove brushes, bristle brushes, pump sprayers, or moldable sponges. A moldable sponge or scouring pad is recommended to stain small gaps between deck boards.
Before painting or staining your new deck, properly clean the surface with mineral spirits or paint thinner and let it dry completely. Priming is also recommended for improved adhesion. Unlike older decks that may require sanding between boards before painting/staining, new decks usually have smaller gaps that don’t need sanding.
Follow these painting and staining tips to achieve a uniform appearance on your deck surface. Remember to allow the new deck to dry for at least two weeks before applying any paint or stain so that it adheres properly.
Allow the new deck to dry for at least two weeks before applying any paint or stain.
Now that you know you can paint or stain a new deck between the boards, waiting for the new deck to dry for at least two weeks before applying any paint or stain is essential. This is because newly installed decks are often treated with chemicals that need time to evaporate and dry out completely.
Once your new deck is ready to paint, applying a coat of primer before painting or staining is the best way to achieve even coverage. Staining between the boards is also an option for a uniform appearance. So, let your new deck dry properly and then apply paint or stain as desired for optimal results. (Read Stagnant Water Under Decking)
Apply a coat of primer before painting or staining to ensure even coverage
Applying primer before painting or staining is crucial for a flawless finish on your outdoor living space – ensuring even coverage and protecting your deck for years.
When preparing to paint between deck boards, start by applying primer at the edge of the paint tray and use a brush to coat small gaps and the deck surface. The primer acts as an adhesive agent, creating a smooth surface for the topcoat while preventing moisture from penetrating the wood.
After allowing the primer to dry completely, apply your chosen stain or paint between deck boards. By taking this extra step, you’ll ensure that your coating has even coverage and lasts longer than without primer. If you choose to paint, use porch and patio paint for durability.
If you choose to paint, use porch and patio paint for durability
If you want your outdoor living space to last, consider using porch and patio paint – don’t you want a durable finish that will withstand the elements? When painting between deck boards on an older deck, preparing the surface by cleaning and sanding any remaining old paint is essential. Additionally, fill in cracks or gaps with wood filler or caulk before beginning.
When applying paint, it’s best to use a small brush for tight spaces and apply at a distance to avoid drips. Use a crack groove brush or pump sprayer for more significant gaps between boards to ensure even coverage.
Porch and patio paint is specially formulated for exterior use and can provide longer-lasting protection than traditional paints. Remember to always read the manufacturer’s instructions before painting between deck boards. If you choose to stain instead of paint, use a water-repellent sealant to protect the wood from moisture and UV rays.
If you choose to stain, use a water-repellent sealant to protect the wood from moisture and UV rays
To ensure your outdoor living space stays protected from moisture and UV rays, it’s essential to use a water-repellent sealant when staining your deck. Stain penetrates the wood deeper than paint, making it ideal for older decks with small gaps between boards.
When applying the stain, use a brush or nozzle to get between the boards and coat them evenly. This will help protect the wood from moisture, which can cause damage over time. Using a water-repellent sealant in conjunction with stain, you can be confident that your deck will look great for years to come.
Now, let’s move on to avoiding paint cracks between deck boards.

How can you avoid paint cracks between deck boards?
To avoid paint cracks between deck boards, apply a thin paint or stain and let it dry before applying another layer. Use a paint roller to apply a smooth and even coat of paint or stain. Spread excess paint evenly to prevent pooling and cracks. Wait for the paint or stain to dry completely before using the deck. Use a sealant to protect the deck from moisture and prevent future gaps between deck boards. (Read Wasp Bomb For Under Deck)
1. Apply a thin coat of paint or stain and allow it to dry before applying another layer
Achieving a smooth and even layer of paint or stain between deck boards requires patience, so applying a thin coat first is essential. This allows it to dry before adding another layer. Here are three reasons why this is important:
- Applying too thick of a coat at once will cause the paint or stain to pool in the gaps between the boards, leading to an uneven finish.
- Drying time may be longer for older decks or those with more significant imperfections.
- A thinner layer allows better penetration into the wood grain, resulting in stronger adhesion and longer-lasting protection.
Once your first coat has thoroughly dried, you can add additional layers until you reach your desired level of coverage. This method ensures that each subsequent layer adheres appropriately without any issues caused by over-application.
Next, we’ll discuss using a paint roller to apply a smooth and even paint or stain on your deck boards.
2. Use a paint roller to apply a smooth and even coat of paint or stain
When painting between deck boards, using a paint roller is one of the best ways to apply deck paint or stain. It allows for quicker coverage and better penetration into the wood grain. However, it is essential to note that a paint roller may not be suitable for all situations, especially if you have a new or older deck with small gaps between boards.
Clean the deck thoroughly before using a paint roller and remove any debris from the space between the boards. Additionally, using other tools, such as a brush or sponge, may be necessary to get into tight spaces or along the sides of deck boards. To ensure an even coat, spread excess paint evenly to prevent pooling and cracks.
3. Spread excess paint evenly to prevent pooling and cracks
Ensure you evenly distribute any excess product to avoid unsightly pooling and cracks, giving your deck a smooth and flawless finish. As you paint between the deck boards, use a brush to spread the excess paint evenly into the gaps. Make sure to get into every space between the deck boards using a nozzle to apply paint directly in small holes.
It’s essential to take time while applying the coat of paint or stain to cover every part of the deck. Doing so creates an even paint film that acts as a stain block between the deck boards. Once finished, it’s time to clean the deck and wait for the paint or stain to dry completely before using it again.
4. Wait for the paint or stain to dry completely before using the deck
After applying the final coat of paint or stain, waiting for it to dry completely before using your deck again is essential. This step is crucial in maintaining the appearance and longevity of your deck. Using paint between deck boards can be tricky, especially on an older deck with small gaps between boards. Applying deck paint correctly takes time and effort, but waiting to dry ultimately ensures it will adhere well and not peel off easily.
Deck maintenance and care are essential in preventing cracks between deck boards and protecting them from moisture damage. Waiting for the paint or stain to dry thoroughly helps prevent footprints or other markings from ruining the freshly painted surface. Use a sealant to protect the deck from moisture and to avoid paint cracks between deck boards as the next step in maintaining your beautiful outdoor living space.
5. Use a sealant to protect the deck from moisture and prevent paint cracks between deck boards
Protect your deck from moisture damage and prevent cracks by using a sealant, ensuring the longevity and beauty of your outdoor living space. Applying paint between deck boards can be challenging, but it is essential to protect all areas of the deck to keep it looking great for years to come.
A sealant can help prevent water from seeping into small gaps between deck boards, leading to rotting or warping over time. Whether you are working with an older deck or a new one, apply a sealant after painting between the boards. Here is a table outlining some common types of bonds and their benefits:
| Sealant Type | Benefits |
|---|---|
| Acrylic | Dries quickly, easy cleanup |
| Silicone | Waterproof, flexible |
| Polyurethane | Durable finish, suitable for high-traffic areas |
A sealant will protect your deck from moisture and help prevent paint cracks between the boards. This extra step in the painting process may take some time and effort but will pay off in the long run. So now that you know how to protect your deck with a sealant, let’s answer the question: Is there a difference between painting and staining on deck boards?
Is there a difference between painting and staining on deck boards?
Choosing between painting and staining for your deck boards is like choosing between a suit and a tuxedo – both have unique benefits, but it ultimately depends on the occasion. If you have an older deck with small gaps between the boards, using paint may be the better option, as it can fill those gaps and provide a protective layer.
However, staining may be more suitable if you want to maintain the natural look of your wood deck. Stains are easier to apply and can bring out the natural beauty of the wood while still providing some protection.
When applying deck paint or stain, get in between the sides of deck boards and any small gaps to ensure even coverage. Whether you paint or stain your deck depends on preference and what will work best for your situation. (Read Can Propane Tanks Freeze And Explode)
Conclusion
Congratulations! You’ve successfully painted between your deck boards and achieved a smooth, even coat. Now, take a step back and admire your handiwork. Ironically, something as simple as painting between deck boards can be challenging, but with the right tools, materials, preparation, and technique, you’ve made it look easy.
Always choose the best paint or stain for your deck’s material and climate, follow manufacturer instructions carefully, and maintain your deck regularly. Doing so’ll protect your investment and enhance its beauty and functionality for years.
In conclusion, painting between deck boards may seem daunting at first glance. Still, with persistence and patience – along with our helpful tips and techniques – you can achieve professional-looking results quickly. So go ahead – grab that paintbrush or stain applicator – and get ready to transform your deck into an outdoor oasis. Happy painting!