How to Repair Loose Deck Railing Posts
Give the wobbly post a gentle push and listen for a creak—if it shivers, the screws are loose, rusted, or the wood is rotted, so grab a drill, a screwdriver, and some stainless‑steel or galvanized structural screws, then pry out the old fasteners, add a 4×4 block between the post and rim joist, pre‑drill, drive the new screws in tight, seal the metal with waterproof coating, and finish with a pull‑test using a 200‑lb weight; keep an eye out for more tips if you want to plunge deeper.
TLDR
- Identify loose posts by pushing the rail; wobble, creak, or shivering indicates looseness.
- Remove rusted or damaged fasteners with a drill or impact driver, protecting surrounding boards with plywood.
- Install blocking (4×4s or 2× lumber) between the post and rim joist, then drive structural screws (8‑in. timber or #30 driver) into the block and joists.
- Replace all hardware with stainless‑steel or hot‑dip galvanized screws, pre‑drilling pilot holes to avoid wood splitting.
- Test stability by applying load (e.g., 200‑lb weight) and checking for any movement; reseal bolt holes with liquid sealant to prevent future corrosion.
Identify Common Signs of Loose Deck Railing Posts
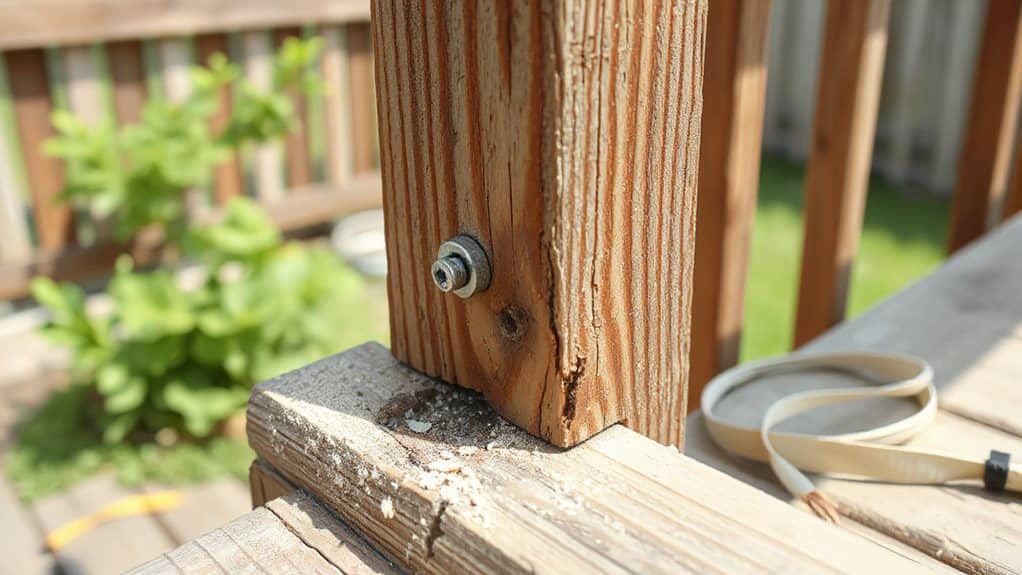
When you’re out on a weekend camping trip and the wind starts rattling the deck, you’ll instantly notice if a railing post is loose—just give it a gentle push and watch for that wobble, the creak, or the way the whole rail shivers like a tent in a storm. You’ll feel postsble posts, hear creaks, see rusted or missing screws, spot cracked wood, and notice soft deck boards under the post, all telling you the railing needs fixing. Strong winds can constantly stress the connections, making the wobble more pronounced. Many insects survive winter by seeking insulated microhabitats that buffer temperature swings and moisture, which is why debris and buried soil near deck posts can attract pests.
Essential Tools & Materials for Fixing Loose Deck Railing Posts
Getting the right tools and materials is the secret sauce that turns a wobbly railing into a sturdy sidekick for your next camping expedition, and trust me, you’ll want a power drill with the right bits ready to pop pilot holes before you even think about screwing anything in.
Pack an impact driver, hammer, wrench, tape measure, deck screws, galvanized brackets, wood hardener, epoxy paste, preservatives, safety gloves, goggles, and a pry bar, then you’ll be set to tighten, reinforce, and protect every post for happy campers. Recovery usually takes a few weeks to a month, with new growth indicating successful adaptation.
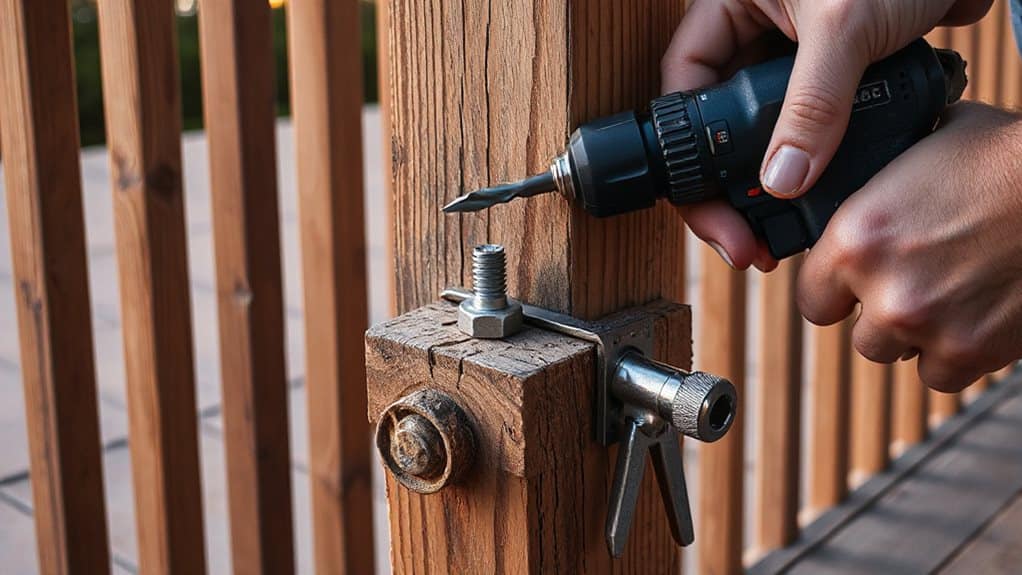
How to Remove Old Screws and Connectors From Deck Posts
You’ll want to gather the right tools first—think a sturdy screwdriver, a drill with a slightly oversized metal bit, and a pair of mole‑grips—so you’re not fumbling around like a tourist without a map. Protect the surrounding boards with a scrap of plywood or a towel, then apply controlled extraction techniques, like drilling into a sunk head just enough to break its grip before pulling it out with pliers; it’s kind of like setting up a camp stove: you need the right gear and a careful hand, or else you’ll end up with a burnt mess. Ready to tackle those stubborn screws and connectors? Let’s get into it and make that deck post feel as solid as a perfectly pitched tent! Use stainless steel hardware when reinstalling to prevent future corrosion and loosening.
Gather Proper Tools
Grab the right gear before you start wrestling those stubborn deck‑post screws, because having a solid toolbox is the difference between a quick fix and a full‑blown DIY disaster. Pack a 40‑piece extractor set with left‑hand cobalt bits, a sturdy hand screwdriver, pliers, and a slow‑speed drill; toss in a small angle grinder for rusted remnants, and don’t forget a demo blade for quick cuts, so you’re ready to help friends tackle any post problem.
Protect Surrounding Surfaces
Since the deck post is the backbone of your outdoor excursion, you’ll want to keep the surrounding wood pristine while you yank out those stubborn, rust‑caked screws and old connectors; think of it like clearing a campsite without trampling the grass—first, loosen the plug or connector with a gentle twist or a pry bar, then use a crew extractor or a slow‑speed drill with a left‑hand bit to back the screw out, applying steady horizontal pressure under the head so it doesn’t snap and scatter metal shards across the joist.
Protect the deck by laying drop cloths, taping edges, and catching debris in a bucket, because keeping the wood clean feels as satisfying as a fresh campsite sunrise.
Apply Controlled Extraction Techniques
Kickstarting the extraction is a lot like setting up a campsite—first you clear the area, then you pull out the stubborn gear with a mix of patience and the right tools. You’ll predrill pilot holes, tap stuck screws with a hammer, and use a 1/2‑inch drill for through‑bolts, while a scrap 2×4 supports the post.
Clean debris with a chisel, check plumb with a level, and enjoy the satisfying “click” of each fastener gone.
Choose the Right Screws for Loose Deck Railing Posts
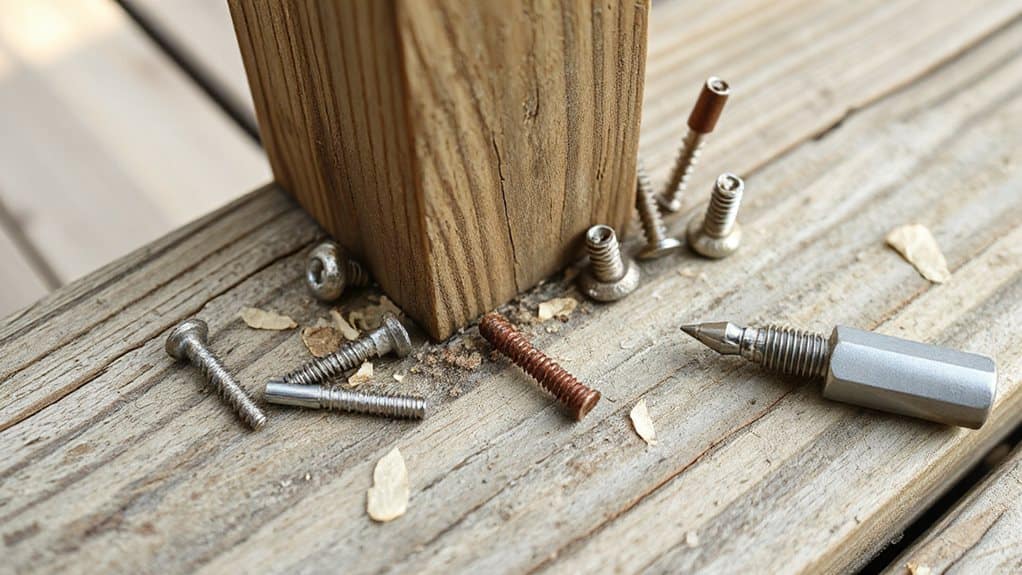
Even if your deck railing feels wobbly, picking the right screws can turn a shaky mess into a rock‑solid masterpiece faster than you can set up a campsite tent.
Use GRK’s 5/16‑inch Rugged Structural Screws with a #30 driver for wood, or Caliburn XL concrete screws for stone bases—pre‑drill with the proper bit, torque securely, and enjoy a sturdy railing that feels like a camp‑ground triumph.
Preserve soil life by avoiding indiscriminate treatments that kill beneficial organisms like earthworms, which help maintain healthy soil structure and drainage.
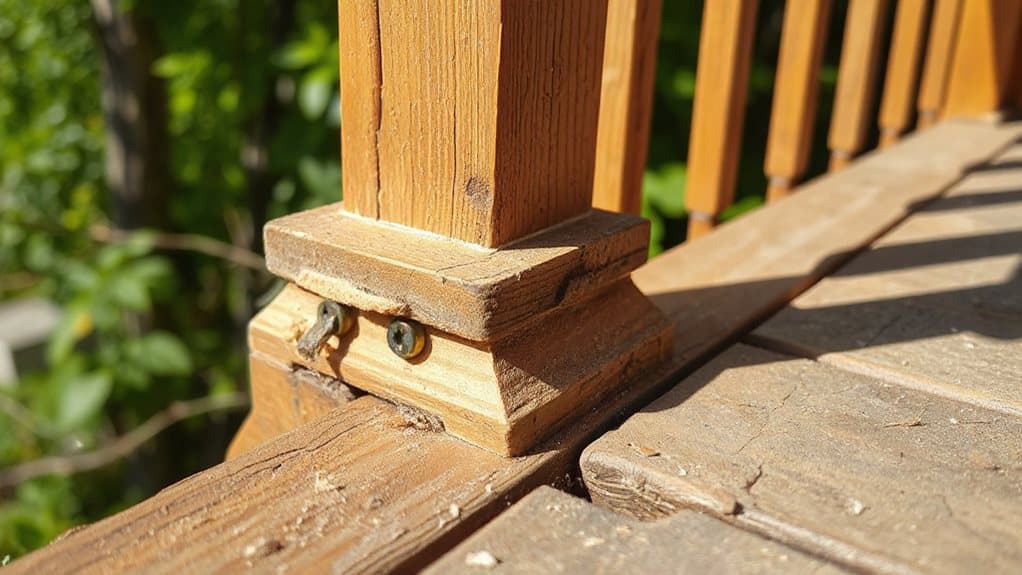
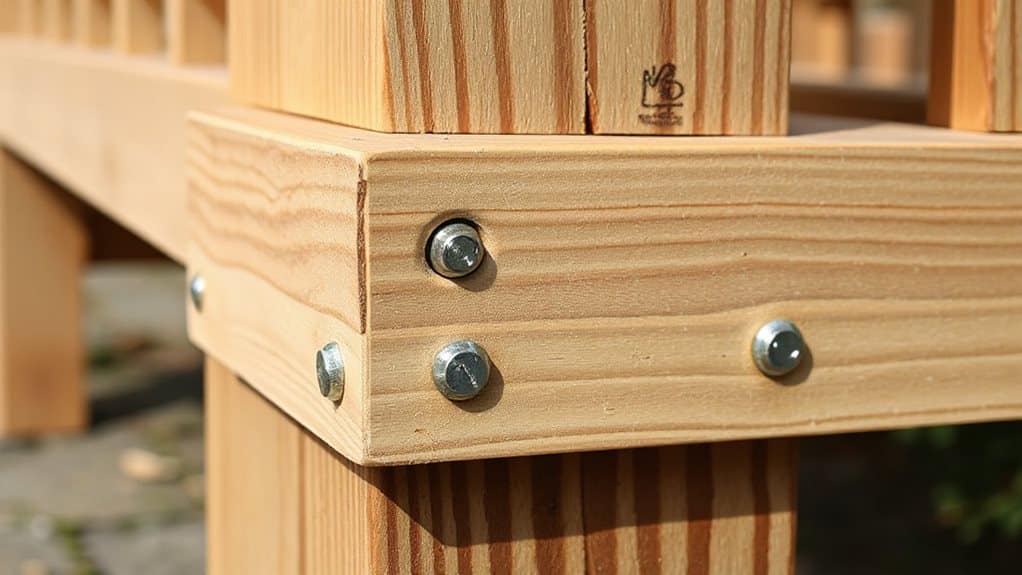
Install Blocking to Reinforce Post‑to‑Rim Joist Connections
Ever wondered why a wobbly railing feels like a tent pole in a hurricane? You’ll love adding blocking: cut 4×4s and 2× lumber scraps, mark the rim joist, pre‑drill, then screw 8‑inch Timber screws through the post and joist into the block, and 5‑inch screws to side joists. This stops twisting, spreads load, and makes every post feel rock‑solid, like a sturdy campsite tripod. If your deck has nearby outdoor outlets or wiring, be mindful that loose wiring can pose a fire risk and avoid drilling into electrical components.
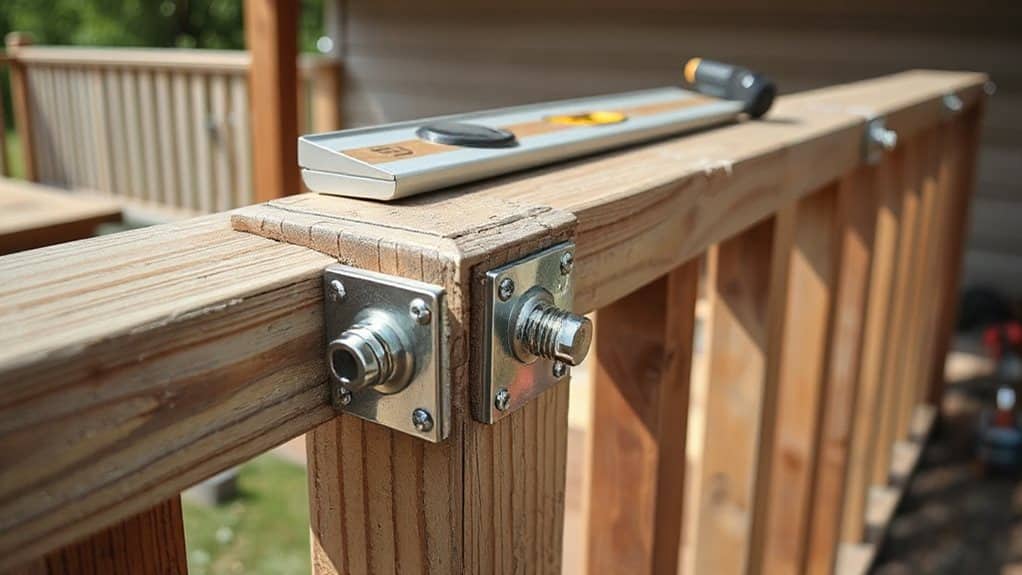
Tighten Lag Screws and Bolts Without Over‑Driving
Grab the right‑sized wrench or drill bit, then give each lag screw a firm, controlled twist—think “just enough to feel snug, not enough to strip the wood,” like when you’re tightening a campsite tent pole and don’t want it snapping. After you’ve applied that torque, give the post a quick shake or tug to see if any wobble remains; if it still moves, you’ve probably under‑tightened, but if it’s rock‑solid, you’ve hit the sweet spot.
Finally, double‑check all the bolts and the b by rotating the whole assembly, because a little extra care now saves you a big headache later—trust me, I’ve learned that lesson the hard way on a rainy weekend trip!
Identify Proper Tool Size
How do you make sure you’re not turning a lag screw or bolt into a stripped mess while you’re tightening it? Grab the drill with a Torx bit that matches the Simpson Strong‑Tie head, use a 1/2‑inch drill for five‑inch timber screws, and pick a socket or open‑end wrench that fits the bolt’s nut exactly. Check pilot holes with a 1/2‑inch auger, match wrenches to bolt diameters, and keep a ratchet handy to avoid over‑driving.
Apply Controlled Torque
After you’ve double‑checked that you’re using the right size Torx bit and a snug‑fitting wrench, it’s time to put a little muscle into the turnbuckle without turning it into a stripped‑out mess. Grab a 3/8‑inch wrench, hold the fitting, and turn clockwise a few clicks; those tiny twists skyrocket tension.
Use a torque handle or gauge, stop at the manufacturer’s number, and you’ll feel the cables snugly kiss, not scream.
Check for Movement After Tightening
Ever wonder if your deck railing is still wobbling after you’ve tightened those lag screws and bolts? Push and pull each post, shake it, then press the top as if a camper’s backpack lands on it; test rail joints by leaning. If anything rocks, re‑tighten, balance cable tension, and double‑check nuts—because a solid, wobble‑free railing lets you safely guide friends on adventures.
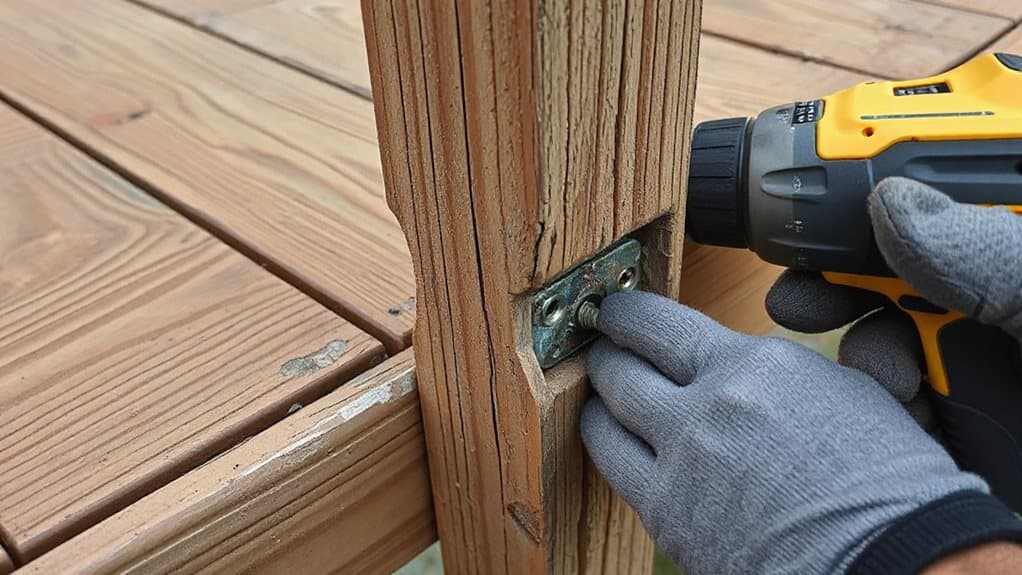
Add Metal Connectors to Secure Loose Deck Railing Posts
When you hook a metal connector onto a wobbly railing post, you instantly turn a shaky mess into a rock‑solid support that feels as reliable as a well‑packed camping stove on a rainy night—so why not give it a try?
Choose stainless or coated steel anchors, drill 5/8‑inch pilot holes, slide a 1/2‑inch through‑bolt through the base plate, shim for plumb, then tighten with a wrench, ensuring the post stays vertical and safe for guests.
How to Safely Swap Out Rotting or Rusty Fasteners?
You’ll first spot the corroded fasteners by giving the railing a good shake and checking for any rust‑stained or splintered screws, then grab a screwdriver or drill with the right bit and gently pry them out without cracking the wood—just think of it like untangling a knot on a camping trip, only the knot is metal and you’re not losing any marshmallows.
Once the old, rotten pieces are clear, swing in high‑quality, rust‑resistant screws that match the manufacturer’s specs, making sure they’re long enough to bite into the blocking behind the deck boards.
Finally, tighten them until the rail feels solid, test for any wobble, and you’ll have a sturdy, camper‑ready railing that won’t let you down on your next outdoor adventure.
Identify Corroded Fasteners
So, you’ve spotted a squeaky board or a tiny gap in your deck railing and you’re wondering whether those fasteners are secretly rotting away—well, let’s delve into the clues and the safe swap‑out process!
Look for rust stains, flaking metal, or nails popping out; tap hollow areas to hear a thin vibration; press the rail for wobble; check under the deck for pitting. If you see any, those fasteners are corroded and need replacing.
Remove Safely With Proper Tools
Spotting rust or a wobbling rail is just the start—now it’s time to grab your tools and swap those tired fasteners out without turning the deck into a DIY disaster zone.
Slip on gloves, pop on safety glasses, then use a cordless drill with the right screwdriver bit to loosen screws fast, pry bars and a rubber mallet to coax stubborn bolts, and a hammer or cat’s paw for nails.
Keep the area clear, mark orientation, and enjoy the satisfying click‑clack of progress.
Install New Rust‑Resistant Screws
Excitement builds when you swap out those rust‑gnawed fasteners, because a solid rail post is the backbone of every backyard quest—think of it as the sturdy trail marker that keeps your campsite safe and your friends from tumbling off the edge.
Choose stainless‑steel or hot‑dip galvanized screws, pre‑drill hardwood, drive eight‑inch structural screws past joists, and use square‑drive bits to avoid stripping; remember, a tight, rust‑proof post lets everyone enjoy the trail without worries.
Seal Deck Railing Posts With Weather‑Proof Coating
Ever wondered how a simple coat of weather‑proof paint can turn a wobbly deck railing into a fortress against rain? You’ll start by cleaning the baseplate, then apply liquid sealant to every bolt hole and threading, ensuring the underside gets a protective film.
Next, spread an even waterproofing membrane, covering the whole plate, and finally roll on a thick, weather‑proof coating that bonds with the deck surface, sealing every gap.
Test Post Stability After Repairs Are Complete
So, how do you know your repaired deck railing posts are actually solid enough to hold you up on a breezy camping trip? Pull a 200‑pound scale, hook a rope with a clove hitch to the rail’s midspan, and push; if it doesn’t wobble, you’ve nailed it.
Double‑check bolts, spacing, and joist attachment, then give the post a firm tap—no rattling means it’s ready for an excursion.
Schedule Regular Maintenance to Keep Posts Secure
Keeping your deck railing posts in top shape isn’t just a “nice‑to‑have” task—it’s the secret sauce that lets you swing from a breezy campsite to a sunny backyard without a wobble, and you’ll want to set a regular maintenance schedule that feels as easy as packing a snack for a hike. Sweep weekly, deep‑clean spring and fall, inspect fasteners quarterly, and check for rot after winter; this routine keeps posts solid, protects guests, and lets you host campfire stories without worry.
Overall
Now that you’ve tightened everything, your deck railing will feel as solid as a mountain‑top campsite, and you can actually lean on it without worrying it’ll wobble. Did you notice how satisfying it is to hear that “click” when the new screw bites into the wood? Go ahead, give each post a good shake, and if it stays put, you’ve nailed it—literally! Keep an eye on the fasteners, and you’ll be ready for any backyard escape, rain or shine.