How To Use A Flaring Tool
Are you tired of struggling with soldering and looking for a more efficient way to join copper tubing? Look no further than a flaring tool. This remarkable tool allows you to create a secure mechanical joint using flare fittings, eliminating the need for messy soldering. A flaring tool is your go-to solution, whether you’re distributing A/C refrigerant, gas, fuel oil, or high-pressure water through soft copper or aluminum pipes.
But how do you use this tool effectively? In this article, we will guide you step-by-step on how to use a flaring tool like a pro. From choosing the right tool for your needs to achieving smooth and even flare connections, we’ve got you covered. We’ll also address common challenges and provide practical tips to make your flaring experience seamless.
So get ready to master the flaring tool and discover its wide range of applications in various fields. Plus, we’ll delve into its specific application in automotive work, such as brake lines.
Let’s dive in!

What is a flaring tool, and why is it important?
If you’re looking to understand the functionality of flares and why a flaring tool is important, it’s essential to know that flare fittings provide a strong and reliable connection for distributing various substances through soft copper or aluminum pipes. A flaring tool plays a crucial role in creating this connection by shaping the end of the pipe into a smooth and even flare.
These tools are designed to accommodate different tubing materials like copper, brass, and aluminum, making them versatile for various applications. With components such as die blocks, cones, yokes, and handle mechanisms, a flaring tool allows you to create secure joints efficiently and effectively. (Learn Maytag Front Load Washer Door Locked Light Flashing)
Understanding the flare functionality
To truly grasp the functionality of the flare, you must understand its purpose and how it ensures a secure and leak-proof connection between pipes or tubing. Tube flaring is a process used to create a mechanical joint by expanding the end of the tube to form a flare shape. This flare shape allows easy insertion into a corresponding fitting known as a flare fitting.
The flaring tool kit is essential for achieving this precise and uniform flare. It consists of various components like die blocks, flaring cones, yokes, and handles that work together to create a smooth, even flare on the tube end. Using the appropriate size die block and following proper techniques, you can achieve a tight seal that prevents leaks in your plumbing or automotive applications. Understanding the functionality of flares sets the stage for comprehending why having a reliable flaring tool is crucial in achieving professional-grade results without compromising safety or efficiency.
The relevance of a flaring tool
Get ready to experience the game-changer in your plumbing or automotive projects with a flaring tool, because it’s the key to achieving flawless and leak-proof connections. When working with copper tubing or brake lines, a flaring tool is indispensable to make your life much easier. With its ability to create precise and uniform flares, this tool ensures your connections are secure and free from leaks.
To give you a better understanding of the different types of flaring tools available, here is a table showcasing some popular options:
| Flaring Tool | Material | Size Range |
|---|---|---|
| Hydraulic Flare Tool | Steel | 3/16″ – 1/2″ |
| Manual Flare Tool | Aluminum | 1/8″ – 3/4″ |
| Leveraged Manual Flare Tool | Brass | 1/4″ – 5/8″ |
| Compact Brake Flare Tool | Copper | 3/16″ |
Now that you know how essential a flaring tool is for your projects, let’s dive into the different types of tubing materials: copper, brass, and aluminum.
Types of tubing materials: Copper, brass, and aluminum
Explore the world of tubing materials and discover the versatility of copper, brass, and aluminum for all your plumbing and automotive needs. Copper pipe is a popular choice due to its durability and resistance to corrosion. It is commonly used in residential plumbing systems for water supply lines.
Aluminum tubing, on the other hand, offers lightweight and flexible properties, making it ideal for automotive applications such as brake lines. Brass tubing combines the benefits of both copper and aluminum with excellent corrosion resistance and malleability. When using a flaring tool, it’s important to consider the type of tubing material you are working with as each requires specific techniques for achieving a proper flare.
Now let’s move on to an overview of flaring tool kit components.
An overview of flaring tool kit components
The flaring tool kit is like a well-orchestrated symphony, with various components working together to create the perfect flare. It includes essential tools such as a tubing cutter, flaring bar, and deburring feature. These components ensure precise and accurate results when flaring copper tubing or pipe.
The tubing cutter allows for clean and even cuts of the tubing, ensuring a proper fit. This creates a seamless connection between the tubing and fittings. It helps prevent leaks and ensures the longevity of the joint. The flaring bar shapes the end of the tubing into a flare. It provides stability during the flaring process. The different sizes of the flaring bar accommodate various tubing diameters. (Learn Paint In Between Deck Boards)
With these tools, you can confidently create professional-quality flares for your project.
Now let’s delve into the role of a flaring tool in pipe and copper tubing installations.
The role of a flaring tool in pipe and copper tubing
Now that you understand the components of a flaring tool kit let’s delve into the role of a flaring tool when working with pipe and copper tubing.
The flaring tool creates a secure and leak-proof connection between pipes and copper tubing. Using the flaring tool, you can create precise and uniform flares on the ends of the tubing, ensuring a tight fit with flare fittings. This is particularly important when working with soft copper tubing or aluminum pipes.
The flaring tool allows you to easily shape the end of the tubing into a 45-degree flare, providing a smooth surface for mating with the fitting. It ensures that the flare is evenly formed without reaching the fitting threads. Its die block and flared cone attachments simplify the process by guiding you through cutting, deburring, inserting the pipe into the die block, tightening wingnuts, and turning handles to move cones into pipes.
Using a flaring tool correctly can achieve professional-grade results for your piping projects. Now that we understand how essential a flaring tool is for working with pipe and copper tubing connections let’s choose the right one for your specific needs.
How to choose the right flaring tool?
When choosing the right flaring tool, consider the fitting you require, whether it’s a SAE flare or swage fitting. Additionally, you’ll need to decide between a heavy-duty or standard flaring tool based on your specific needs and usage.
Matching the tubing diameter with the appropriate flaring tool size is important for accurate and consistent results. Price, quality, and brand should also be considered when seeking the best flaring tool kit that suits your requirements. (Read How To Fix A Stripped Screw Hole Metal)
Lastly, don’t forget to select the right flaring bar and cutter for efficient and precise flares.
Finding the right fitting: SAE or swage
To find the right fitting for your flaring tool, consider whether an SAE or swage fitting is more suitable. The choice between these two options depends on the specific requirements of your project. SAE or flare fittings are commonly used for distributing A/C refrigerant, gas, fuel oil, or high-pressure water through soft copper or aluminum pipes. They have a 45-degree flare and provide a strong and secure connection.
On the other hand, swage fittings are used for joining pipes by compressing them with a special tool. Swage fittings offer a tight and leak-proof connection without threads or soldering. Consider the type of tubing you will be working with and the specific application to determine whether an SAE or swage fitting is the best choice for your flaring tool.
Now let’s move on to choosing between heavy-duty and standard flaring tools…
Choosing between heavy-duty and standard flaring tools
Consider the strength and durability you need for your project and choose between a heavy-duty flaring tool like a sturdy workhorse or a standard flaring tool like a reliable everyday companion. A heavy-duty flaring tool is recommended if you’re working on brake lines or other heavy-duty applications. Designed to withstand harsh conditions, these tools have robust construction that can handle the demands of brake line repairs.
On the other hand, if you’re working on smaller projects or occasional repairs, a standard flaring tool will suffice. While not as rugged as their heavy-duty counterparts, these tools are still reliable and efficient for most DIY needs.
Now let’s move on to discussing tubing diameters and flaring tool sizes…
Discussing tubing diameters and flaring tool sizes
Now that you understand the differences between heavy-duty and standard flaring tools, let’s discuss tubing diameters and how they relate to flaring tool sizes.
The size of the tube you’re working with will determine the appropriate flaring tool to use. Flaring tools come in various sizes to accommodate different tube sizes, typically 3/16 inch to 5/8 inch. It’s crucial to select a flaring tool that matches the diameter of your tubing for a proper fit and secure connection. Using an incorrect size can result in leaks or damaged fittings. Be sure to measure the diameter of your tubing accurately before purchasing a flaring tool kit.
Now, let’s move on to the next section about “price, quality, and brand: how to get the best flaring tool kit.”

Price, quality and brand: How to get the best flaring tool kit
Looking for the best flaring tool kit? Ensure you find one that offers a great balance of price, quality, and brand reputation. Here are some factors to consider when choosing the right flaring tool kit:
- Price: Look for a kit that fits your budget without compromising on quality. Consider both upfront cost and long-term value.
- Quality: A high-quality flaring tool kit will be durable, reliable, and provide consistent results. Look for tools made from sturdy materials like steel or aluminum.
- Brand reputation: Choose a reputable brand with positive reviews and a track record of producing reliable tools. This ensures you’re getting a product backed by expertise and customer satisfaction.
- Features: Consider the specific features of the kit, such as interchangeable dies, ergonomic design, or additional accessories that can enhance your flaring experience.
Now that you know what to look for in a flaring tool kit, let’s pick the right flaring bar and cutter…
Picking the right flaring bar and cutter
When choosing the right flaring bar and cutter, it’s important to find options that will make your flaring experience enjoyable and efficient. The flaring tool is the main component, but having a high-quality flaring bar and cutter can greatly enhance your results. The flaring bar provides stability and accuracy while creating the flare, and the cutter ensures clean cuts on the tubing. Here are some key factors to consider when selecting these tools:
| Flaring Bar | Cutter | |
|---|---|---|
| Material | Durable steel or aluminum construction | Hardened steel for precise cutting |
| Size Options | Multiple sizes available | Adjustable for different tubing diameters |
| Ease of Use | Comfortable grip | Smooth cutting action |
| Stability | Securely holds tubing in place | Sturdy design prevents slipping |
| Compatibility | Works with various types of tubing | Suitable for specific pipe materials |
You can ensure accurate and professional-looking results by choosing the right flaring bar and cutter. Now, let’s learn how to use a flaring tool: a step-by-step guide.
How to use a flaring tool: A step-by-step guide
Before using the flaring tool, it’s important to set up the process correctly. Start by cutting the tube to the desired length and removing any burrs using a deburring tool.
Then, secure the tubing with the clamp and flaring bar, ensuring it’s a tight fit.
Next, use the yoke and cone to create a seal by tightening them together.
Finally, finalize the flare on the pipe or tube by turning the handle of the flaring tool until it’s smooth and even. (Learn Stihl Chainsaw Upgrades)
Proper setup before using the flaring tool: Tube cutting and deburring
Little did you know that tube cutting and deburring is an absolute breeze when using a flaring tool – it’s like a walk in the park! Here’s how to properly set up your tubing before using the flaring tool:
- Measure and cut: Use a tape measure to determine the desired length of tubing, then cut it with a tubing cutter. Avoid using a hacksaw, as it can weaken the metal.
- Remove burrs: After cutting, remove any burrs on the edge of the tubing using a screwdriver or the deburring feature of the tubing cutter. Be careful not to thin out the metal while deburring.
- Clean fittings: Clean any metal parts on the end of the tubing to ensure there is no debris during the flaring process.
- Add fittings: Slide fittings into each end of the tubing with threading facing towards the cut end. Two fittings should be added, pointing in opposite directions.
Now that you have prepared your tubing let’s secure it with a clamp and flaring bar for proper flaring.
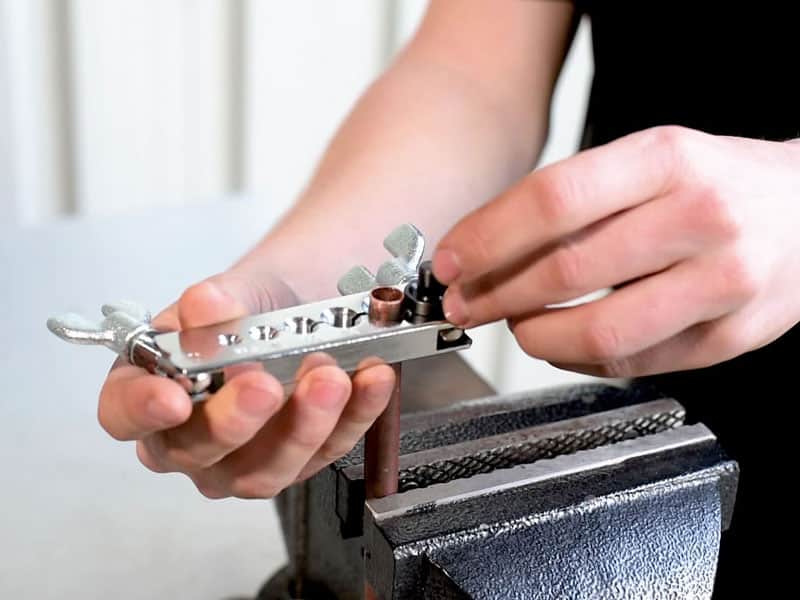
Securing the tubing with the clamp and flaring bar
To ensure a secure and stable setup for flaring your tubing, you’ll need to firmly clamp the tubing in place using the tubing clamp and attach the flaring bar. The tubing clamp is an essential component of the flaring tool as it holds the tubing securely in position, preventing any movement or slippage during the flaring process. This ensures that your flare will be precise and accurate.
Once the tubing is securely clamped, you can attach the flaring bar to the tool. The flaring bar provides support and stability to the tubing while allowing for controlled movement when creating the flare. It ensures the flare is formed evenly and smoothly along its entire length.
With the tubing clamp and flaring bar in place, you are ready to use the yoke and cone: the heart of the flaring process.
Using the yoke and cone: The heart of the flaring process
Once the tubing is securely clamped, you can attach the flaring bar and utilize the yoke and cone, which are essential components at the core of the flaring process. Here’s how to use them effectively:
- Position the yoke assembly onto the die block with the cone facing outward.
- Insert the end of the tubing into the appropriate size hole on the die block.
- Tighten the wingnuts on the yoke assembly to secure it in place.
- Turn the handle clockwise to move the cone into the tubing, gradually expanding it to create a flare.
Using these steps and employing proper techniques will ensure you achieve a precise and uniform flare. With this part of the process complete, you’re now ready to move on to tightening and creating a seal between your newly flared tubing and fittings.

Tightening and creating the seal
It’s time to securely tighten the flare nut and ensure a tight seal between the flared tubing and fittings. Once you have inserted the flared end of the tube into the fitting, slide the flare nut onto the tubing until it reaches the end of the tube. Use your fingers to hand-tighten the flare nut onto the fitting. It’s important to ensure you don’t cross-thread or overtighten the flare nut, as this can damage both the nut and fitting.
To create a proper seal, use a wrench to firmly tighten the flare nut by turning it clockwise. This will ensure that there are no leaks in your system. With this step complete, you’re ready to finalize the flare on the pipe or tube.
Finalizing the flare on the pipe or tube
Now that you’ve securely tightened and sealed your flared tubing and fittings, it’s time to perfect the flare on your pipe or tube. This will ensure a flawless connection, leaving you confident in your workmanship. Using a reliable flaring tool, carefully position the pipe or tube into the appropriate slot or opening. Make sure it’s centered and aligned properly before proceeding.
With the pipe or tube securely in place, tighten any clamps or wing-nuts to hold it firmly. Next, gently rotate the handle of the flaring tool to move the cone into the pipe, expanding and shaping it into a smooth and even flare. Take your time during this step to ensure that the flare sits fully and evenly on the fitting without reaching the threads. This finalizing process is crucial for achieving a leak-free connection with optimal strength and durability.
Transitioning into common challenges and practical tips for using a flaring tool…
Common challenges and practical tips for using a flaring tool
When using a flaring tool, one of the key challenges is ensuring a tight mechanical joint to prevent leaks. This can be achieved by properly cutting the pipe, removing any burrs or debris, and ensuring the flare sits fully and evenly on the fitting without reaching the threads.
Managing different pipe sizes and flaring tool fittings can also be challenging, so having the right tools and adapters for each size is essential. Additionally, knowing when to replace your flaring tool is crucial as worn-out or damaged tools can affect the quality of your flares. Regular care and maintenance, such as cleaning and lubricating the tool, will help prolong its lifespan.
To get the most from your flaring process, follow proper techniques and utilize tips and tricks that make it easier, such as using PTFE tape or pipe joint compound on beveled ends for sealing instead of flare threads. Learning how to slide, swage, and flare soft copper and aluminum tubing effectively will also contribute to successful results in your projects.
Preventing leaks: Ensuring a tight mechanical joint
To achieve a leak-proof connection and ensure peace of mind, it’s crucial to make sure the mechanical joint created by the flaring tool is tight and secure. This is essential for preventing leaks in your brake lines or any other application. After flaring the tubing, carefully inspect the flare to ensure it sits fully and evenly on the fitting without reaching the threads. Any gap or unevenness could lead to potential leaks. Additionally, ensure that you have selected the correct size die for your tubing and that it is securely fastened before starting the flaring process.
Double-checking these details and ensuring a tight mechanical joint can minimize the risk of leaks and ensure a reliable connection.
Now let’s move on to managing different pipe sizes and flaring tool fittings.
Managing different pipe sizes and flaring tool fittings
Explore the versatility of managing different pipe sizes and fitting options with various flaring tool attachments. A flaring tool is designed to accommodate various pipe sizes, allowing you to create precise and secure flares on tubing of varying diameters. You can ensure a tight and leak-proof connection by using the appropriate attachment for your specific pipe size. Flaring tool fittings come in different sizes and shapes to match the corresponding pipes, providing compatibility and ease of use. The table below showcases some common flaring tool fittings:
| Fitting Type | Pipe Size (OD) |
|---|---|
| 1/4″ Flare | 1/4 inch |
| 3/8″ Flare | 3/8 inch |
| 1/2″ Flare | 1/2 inch |
With these versatile options, you can confidently tackle any project that requires different pipe sizes. Now let’s move on to the next section about when you should replace your flaring tool and care and maintenance tips to prolong its lifespan.
When should you replace your flaring tool? Care and maintenance
Take good care of your flaring tool to ensure its longevity, and consider replacing it if you notice any signs of wear or damage. Proper care and maintenance are essential for optimal performance. After each use, clean the tool thoroughly to remove any debris or residue that may have accumulated. Inspect the components regularly for any signs of wear, such as worn-out threads or cracks in the die block.
Lubricate moving parts with light oil to prevent rusting and ensure smooth operation. Store the tool in a dry and secure location to protect it from damage. Remember, a well-maintained flaring tool will provide accurate and consistent results for years.
Now let’s move on to easy-to-use tips and tricks for getting the most from your flaring process.
Easy to use tips and tricks: Getting the most from your flaring process
Maximize the efficiency of your flaring process with these easy tips and tricks that will help you achieve professional results every time. Here are some key techniques to enhance your flaring process:
- Use a lubricant: Apply a small amount of lubricant, such as oil or grease, to the flare cone and pipe for smoother operation.
- Tighten evenly: When tightening the wingnuts on the die block, apply equal pressure on both sides to ensure a uniform flare.
- Check alignment: Before starting the flaring process, ensure the pipe is inserted straight into the die block to prevent uneven flares.
- Inspect for imperfections: After completing a flare, carefully inspect it for any cracks or unevenness. If necessary, reflare the pipe until you achieve a smooth and even end.
| Easy Tips and Tricks | |
|---|---|
| Use Lubricant | Tighten Evenly |
| Check Alignment | Inspect Imperfections |
Following these simple yet effective techniques can enhance your flaring process and achieve high-quality results. Now let’s learn how to slide, swage, and flare soft copper and aluminum tubing without compromising safety or quality.
How to slide, swage, and flare soft copper and aluminum tubing
Now that you’ve learned some easy tips and tricks to get the most out of your flaring process let’s dive into how to slide, swage, and flare soft copper and aluminum tubing using a flaring tool. When working with soft copper and aluminum tubing, it’s important to ensure a secure connection for efficient distribution of A/C refrigerant, gas, fuel oil, or high-pressure water. Here are the steps you need to follow:
- Cut the tubing to the desired length using a tubing cutter.
- Remove any burrs on the cut edge of the tubing.
- Clean the metal parts on the end of the tubing to avoid debris during flaring.
- Slide the flare nut onto the pipe.
- Insert the pipe into the appropriate size slot in the die block of your flaring tool.
- Tighten wingnuts securely to hold everything in place.
- Place the yoke onto the die block and turn its handle clockwise to move the cone into the pipe.
- Continue turning until a smooth and even flare is achieved.
With these steps completed, you’re now ready to explore various applications where flaring tools can be used effectively in different fields.
Next up: Discovering applications of flaring tools in various fields.
Applications of flaring tools in various fields
Explore the applications of flaring tools in different fields and discover how they can be utilized. Flaring tools have a wide range of applications across various industries. In HVAC systems, these tools create secure connections for distributing A/C refrigerant and fuel oil through soft copper or aluminum pipes.
They are also commonly used in plumbing to join high-pressure water or gas pipes. Flare fittings provide a strong alternative to soldering, ensuring leak-free connections.
Additionally, flaring tools find extensive use in automotive repairs, particularly for creating brake lines. By using these tools, DIY enthusiasts can save time and money by making their own brake lines instead of purchasing expensive premade ones or hiring professionals. Brake flaring tools allow for the creation of 45-degree double flares that ensure a reliable and leak-proof connection between brake components.
Now, let’s delve into the details of applying flaring tools, specifically in automotive settings like brake lines and more.
Applying flaring tools in automotive: brake lines and more
Regarding plumbing scenarios, flaring tools are essential for working with copper pipes. These tools allow you to create strong and reliable connections without soldering. In the HVAC industry, flaring tools are commonly used with both copper and aluminum tubing to distribute refrigerant and other fluids.
The industrial applications of the flaring process extend to larger diameter pipes and tubes, providing a versatile solution for joining these materials. And beyond the norm, there are unique uses for flaring tools in various industries where their precision and reliability come in handy.

Plumbing scenarios: Using flaring tools with copper pipes
If you’re working on plumbing scenarios and need to connect copper pipes, let’s talk about how to use a flaring tool for a secure and leak-proof joint. Flaring tools are essential for creating a mechanical joint between copper pipes using a flare connection. To begin, cut the copper pipe to the desired length and remove any burrs or debris from the end.
Slide the flare nut onto the pipe, then insert the pipe into the die block of the flaring tool. Tighten the wingnuts to secure the pipe in place. Place the yoke onto the die block and turn the handle to move the cone into the pipe, creating a smooth and even flare.
The flared end should sit fully and evenly on the fitting without reaching the threads. With these steps, you can confidently use a flaring tool for your plumbing needs. Moving on to HVAC applications, let’s discuss how a flaring tool can be used with copper and aluminum tubing…
The utility of a flaring tool in HVAC: Copper and aluminum tubing
Discover the essential tool for secure and leak-proof joints in HVAC applications: the flaring tool, perfect for working with copper and aluminum tubing. Flare fittings are a solid alternative for soldering when it comes to distributing A/C refrigerant, gas, fuel oil, or high-pressure water through soft copper or aluminum pipes. Flare fittings, made of brass or steel, consist of a threaded body with flared ends and a nut.
To create these reliable connections, a flaring tool is necessary. The flaring process involves cutting the pipe, removing burrs and debris, sliding the flare nut onto the pipe, inserting the pipe into the die block, tightening wingnuts, placing the yoke onto the die block, and turning the handle to move the cone into the pipe.
You can ensure efficient operation in your HVAC system with smooth and even flare ends that sit fully on fittings without reaching threads. Transitioning to industrial applications of larger-diameter pipes and tubes requires different techniques in the flaring process.
The subsequent section will explore industrial applications of the flaring process: larger diameter pipes and tubes, without using the word “step”.
Industrial applications of flaring process: Larger diameter pipes and tubes
In the realm of larger diameter pipes and tubes, the flaring process becomes a symphony of precision, seamlessly melding metal together to create a harmonious flow. Industrial applications that involve larger diameter pipes and tubes rely on the flaring process to ensure secure connections and efficient fluid transfer. This technique is commonly used in oil and gas, chemical processing, and power generation industries.
To give you a better understanding of how flaring is used in industrial settings, here is a table highlighting some common applications:
| Industry | Application |
|---|---|
| Oil and Gas | Flared connections for pipelines carrying crude oil or natural gas |
| Chemical Processing | Flared fittings for chemical transfer lines |
| Power Generation | Flares used in boiler systems for steam distribution |
These examples demonstrate the flaring process’s versatility when handling larger-diameter pipes and tubes. It allows for reliable connections to withstand high pressures and ensure smooth operation within industrial environments.
Moving forward into our next section about ‘Beyond the norm: unique uses of flaring tool,’ we will explore other interesting applications where this versatile tool shines.
Beyond the norm: Unique uses of flaring tool
Beyond ordinary applications, the flaring tool unveils its versatility in a realm where it showcases its unique capabilities. Here are four distinctive ways to utilize a flaring tool:
- Custom Exhaust Systems: A flaring tool can create flare connections for custom exhaust systems. This allows for precise fitting and secure connections between different exhaust components.
- Plumbing Applications: The flaring tool can also be employed in plumbing applications, such as creating flare fittings for water or gas lines. This ensures leak-proof connections and provides added durability.
- DIY Air Conditioning Repairs: A flaring tool is an invaluable asset when it comes to repairing air conditioning systems. It enables users to create proper flare connections for refrigerant lines, ensuring efficient cooling performance.
- Hydraulic System Maintenance: Flare fittings are commonly used in hydraulic systems due to their reliable sealing capabilities and resistance to high pressures. Users can easily repair or replace damaged hydraulic lines with a flaring tool, keeping machinery running smoothly.
The flaring tool goes beyond its conventional uses and proves its worth in various industries and applications.